NEW LAUNCH: Weill Cornell Medicine's Maya app is now available for Android!

NEW LAUNCH: Weill Cornell Medicine's Maya app is now available for Android!
Here is the .env file for your reference:
As per this file configuration, we need to create new folders named migrations and seeds under server/db folder. Migrations will consist of files that will determine our schema structure, while seeds will contain files with our dummy or static data to insert into the database.
Now, to use the config connection with knex, we need to create knex.js under src/db. This file will export a connection module based on the environment.
Now, our folder and file structure should look like this:
- Server
- db
- migrations
- seeds
knex.js
- src
- index.js
.env
knexfile.js
In this step, we'll create tables in our database using the migration tool and insert our dummy data into the same. For more details about knex schema, check out: http://knexjs.org/#Schema
To create schema migration, we need to run a command that will generate an auto-created file under the migration folder with a date-time stamp included in the file name.
For example: 20200122192011_migration_create_table.js
Here’s the command to create a migration file:
knex migrate:make migration_create_table
Now, we need to update this schema to our Postgres database. We’ll run the following command:
npx knex migrate:latest
Now, we can visit our Postgres database and we’ll see that the migration tool has created tables according to the schema we configured.
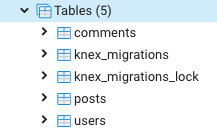
As you see tables created via knex-migrate. (This screenshot is from pgAdmin 4)
Now that we have our tables ready, we can insert some data using seeds. We will create two seed files: one for the user and one for post. Here are the commands and sample files I have created for seeds:
npx knex seed:make 01_users
npx knex seed:make 02_posts
Unlike migration, these commands will create autogenerated files under seeds.
For example: 01_users.js and 02_posts.js
One important thing to remember while creating seed files is to have the filename start with an incremental number, for chronology (read more about this here).
Here are the sample seed files I have created to insert users and one blog associated with that user:
Here, I am using .del() function to delete all existing entries. You can remove that and update the file, based on your requirement.
Now, let’s run the following command to run seeds files:
npx knex seed:run

Result: server/db/seeds/01_users.js

Result: server/db/seeds/02_posts.js
By now, you should have a good grasp of how to use the migration tool and the SQL query builder. You've seen how they can automate the process of creating and maintaining database schemas and managing static data. This is a powerful combination that can greatly simplify your full-stack web development work.
Remember, the power of these tools comes from their flexibility and portability. They allow you to clone your project in a fresh environment and run migration scripts, taking care of everything related to your database schema and static data.
Hopefully this guide has given you a solid foundation to start using these tools in your own projects. Keep exploring and happy coding!
For those of you who want to dive deeper into these topics, I recommend the following resources:
SQL Query Builder Documentation: The official documentation for Knex.js. It's detailed and well-written, covering everything from installation to advanced features.
Database Migration Tools: A helpful article discussing the concept and benefits of database migration tools.

Book a call and we can walk you through our mobile engineering capabilities.


Book a call and we can walk you through our mobile engineering capabilities.
Your phone will break before our apps do.

© 2026, Heady LLC.