NEW LAUNCH: Weill Cornell Medicine's Maya app is now available for Android!

NEW LAUNCH: Weill Cornell Medicine's Maya app is now available for Android!
Let’s get started!
React is a “JavaScript library for building user interfaces”, while TypeScript is a “typed superset of JavaScript that compiles to plain JavaScript.” By using them together, we essentially build our UIs using a typed version of JavaScript.
Go to your root folder and run the following command create react app with typescript.
npm create react-app client --template typescript
Tip: Here, I have kept the app name client . If you wish to change it, you can go to client->package.json and change the name from ‘client’ to ‘GraphQL Cli’.
As we are using GraphQL, Apollo Client will be an ideal library. Apollo Client is a complete state management library for JavaScript apps. If we write a GraphQL query, Apollo Client will take care of requesting and caching our data, as well as updating our UI.
We will require some packages to build our client architecture. Here’s the command that will install all the required packages for us:
yarn add apollo-client apollo-cache-inmemory apollo-link-http
@apollo/react-components @apollo/react-hoc @apollo/react-hooks graphql
graphql-tag
We will be using apollo-hooks to use GraphQL query and mutations. Before that step, let’s structure our folders as follows:
/src
- Components
- graphql
- query
- mutations
The components folder will contain all our react components. Under graphql , Query folder will contain all GraphQl queries, and mutations will go in the mutations folder.
In order to use GraphQl queries and mutations as a hook, we need to implement ‘graphql-code-generator.’
To install the required package and enable the package to use, we’ll run the following command:
yarn add -D @graphql-codegen/cli
Then we’ll set up the codegen configuration by executing the following command:
yarn graphql-codegen init
This will launch a CLI wizard. Next, we’ll follow the steps in this list:
This will create a codegen.yml file in the root.
We will add one more directory in our codegen.yml as we will be saving our queries and mutations separately. We’ll also add one more configuration option withHooks: true , so it will also generate typed React Hook queries and mutations. Our configuration file will look as follows:
To have hook based queries and mutations, we have added them to their respective folders and run the codegen command.
Let’s also create one simple query to fetch user details. We do this by creating a new file getUsers.query.ts under src/graphql/query . (You can use the help from http://localhost:8080/graphiql to get query syntax.) Here’s the query to fetch user details:
You can use other methods, but as we are using apollo-hooks , this is required for codegen. Now, let’s run the following command in the terminal under client folder:
yarn codegen
This will generate a file under src/generated/graphql.tsx based on configuration we have saved under codegen.yml . When we open the file, we’ll find that it has generated type and react hooks queries based on schema and query file.
Note:We need to run the yarn codegen command every time we add a new query and mutation under graphql folder.
We have hook-based queries and mutations available now, so we can use them to display data. Here’s the sample file where we will display users, using generated hooked query:
Next, we can import the Users component into our App.tsx , and run the project using the following command:
yarn start
Similarly, we have to use mutations. Let’s create one mutation to update the user name.
First, check the syntax on http://localhost:8080/graphiql. From our graphiql we will get the mutation we need. Here’s an image for reference:
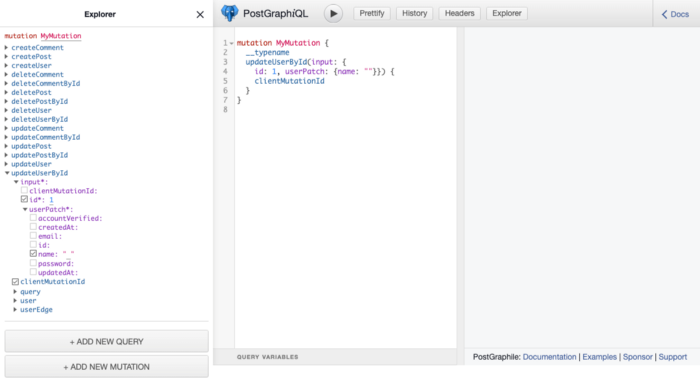
Mutations under graphiql.
Let’s create one more file under
src/graphql/mutations/updateUserById.mutation.ts. Here’s the mutation to update user details by id:
To have this mutation available in hooks, we’ll need to run the following command:
yarn codegen
Before we create a component to update the user, I prefer to have a separate file with the queries and mutations we will use. This is optional, but the reason I like it is that it allows us to get rid of the query and mutation extensions. Also, we can add some custom services in this file and use it from there. This will create one disciplined folder and code structure.
To do so, let create one file under src/utils/services.ts . Now we will import all queries and mutations we will be using in the project. Here’s the code:
Let’s create a new component to update user details under src/Components/UpdateUser.tsx :
client/src/Components/UpdateUser.tsxNow we have updated the Users component to pass details to our new UpdateUser component, and updated the query fetch source to services. For reference:
And now we have completed the architecture! Now we can update our client, server and database.
Good luck! Cheers!


Your phone will break before our apps do.

© 2026, Heady LLC.